Split Ergonomic Keyboards and Touch Typing
In July last year I started thinking about getting an ergonomic split keyboard. Many people choose to get a split keyboard because they are more comfortable to type on, easier to customize, and often have a smaller footprint than traditional keyboards. I had been using a mechanical keyboard for a few years and I was starting to feel that my hands were getting tired after a long day of typing. This is because the majority of mechanical keyboards are quite tall and have the traditional mechanical switches such as Cherry MX Browns. I had heard about split keyboards before, but I had never really considered them. I thought that they would be very complicated to put together and too much trouble overall.
I started to do some research and I found that there were many different types of split keyboards, some of them were very expensive and required many parts, and some of them were very cheap (relatively speaking), designed specifically to streamline the assembly process and keep the cost down. My goal was to learn to touch type, have a nice small keyboard which I can take with me if I travel or go to the office and to be able to utilize the programmability of these keyboards, so I can assign keys how I like. I decided that I wanted to build my own split keyboard, and I started to look for information on how to do it. My research concluded that there were 3 options which would be ideal for me: Lilly58, Corne, and the Cantor. I decided to go with the Cantor because it was the cheapest overall and required the least amount of parts.
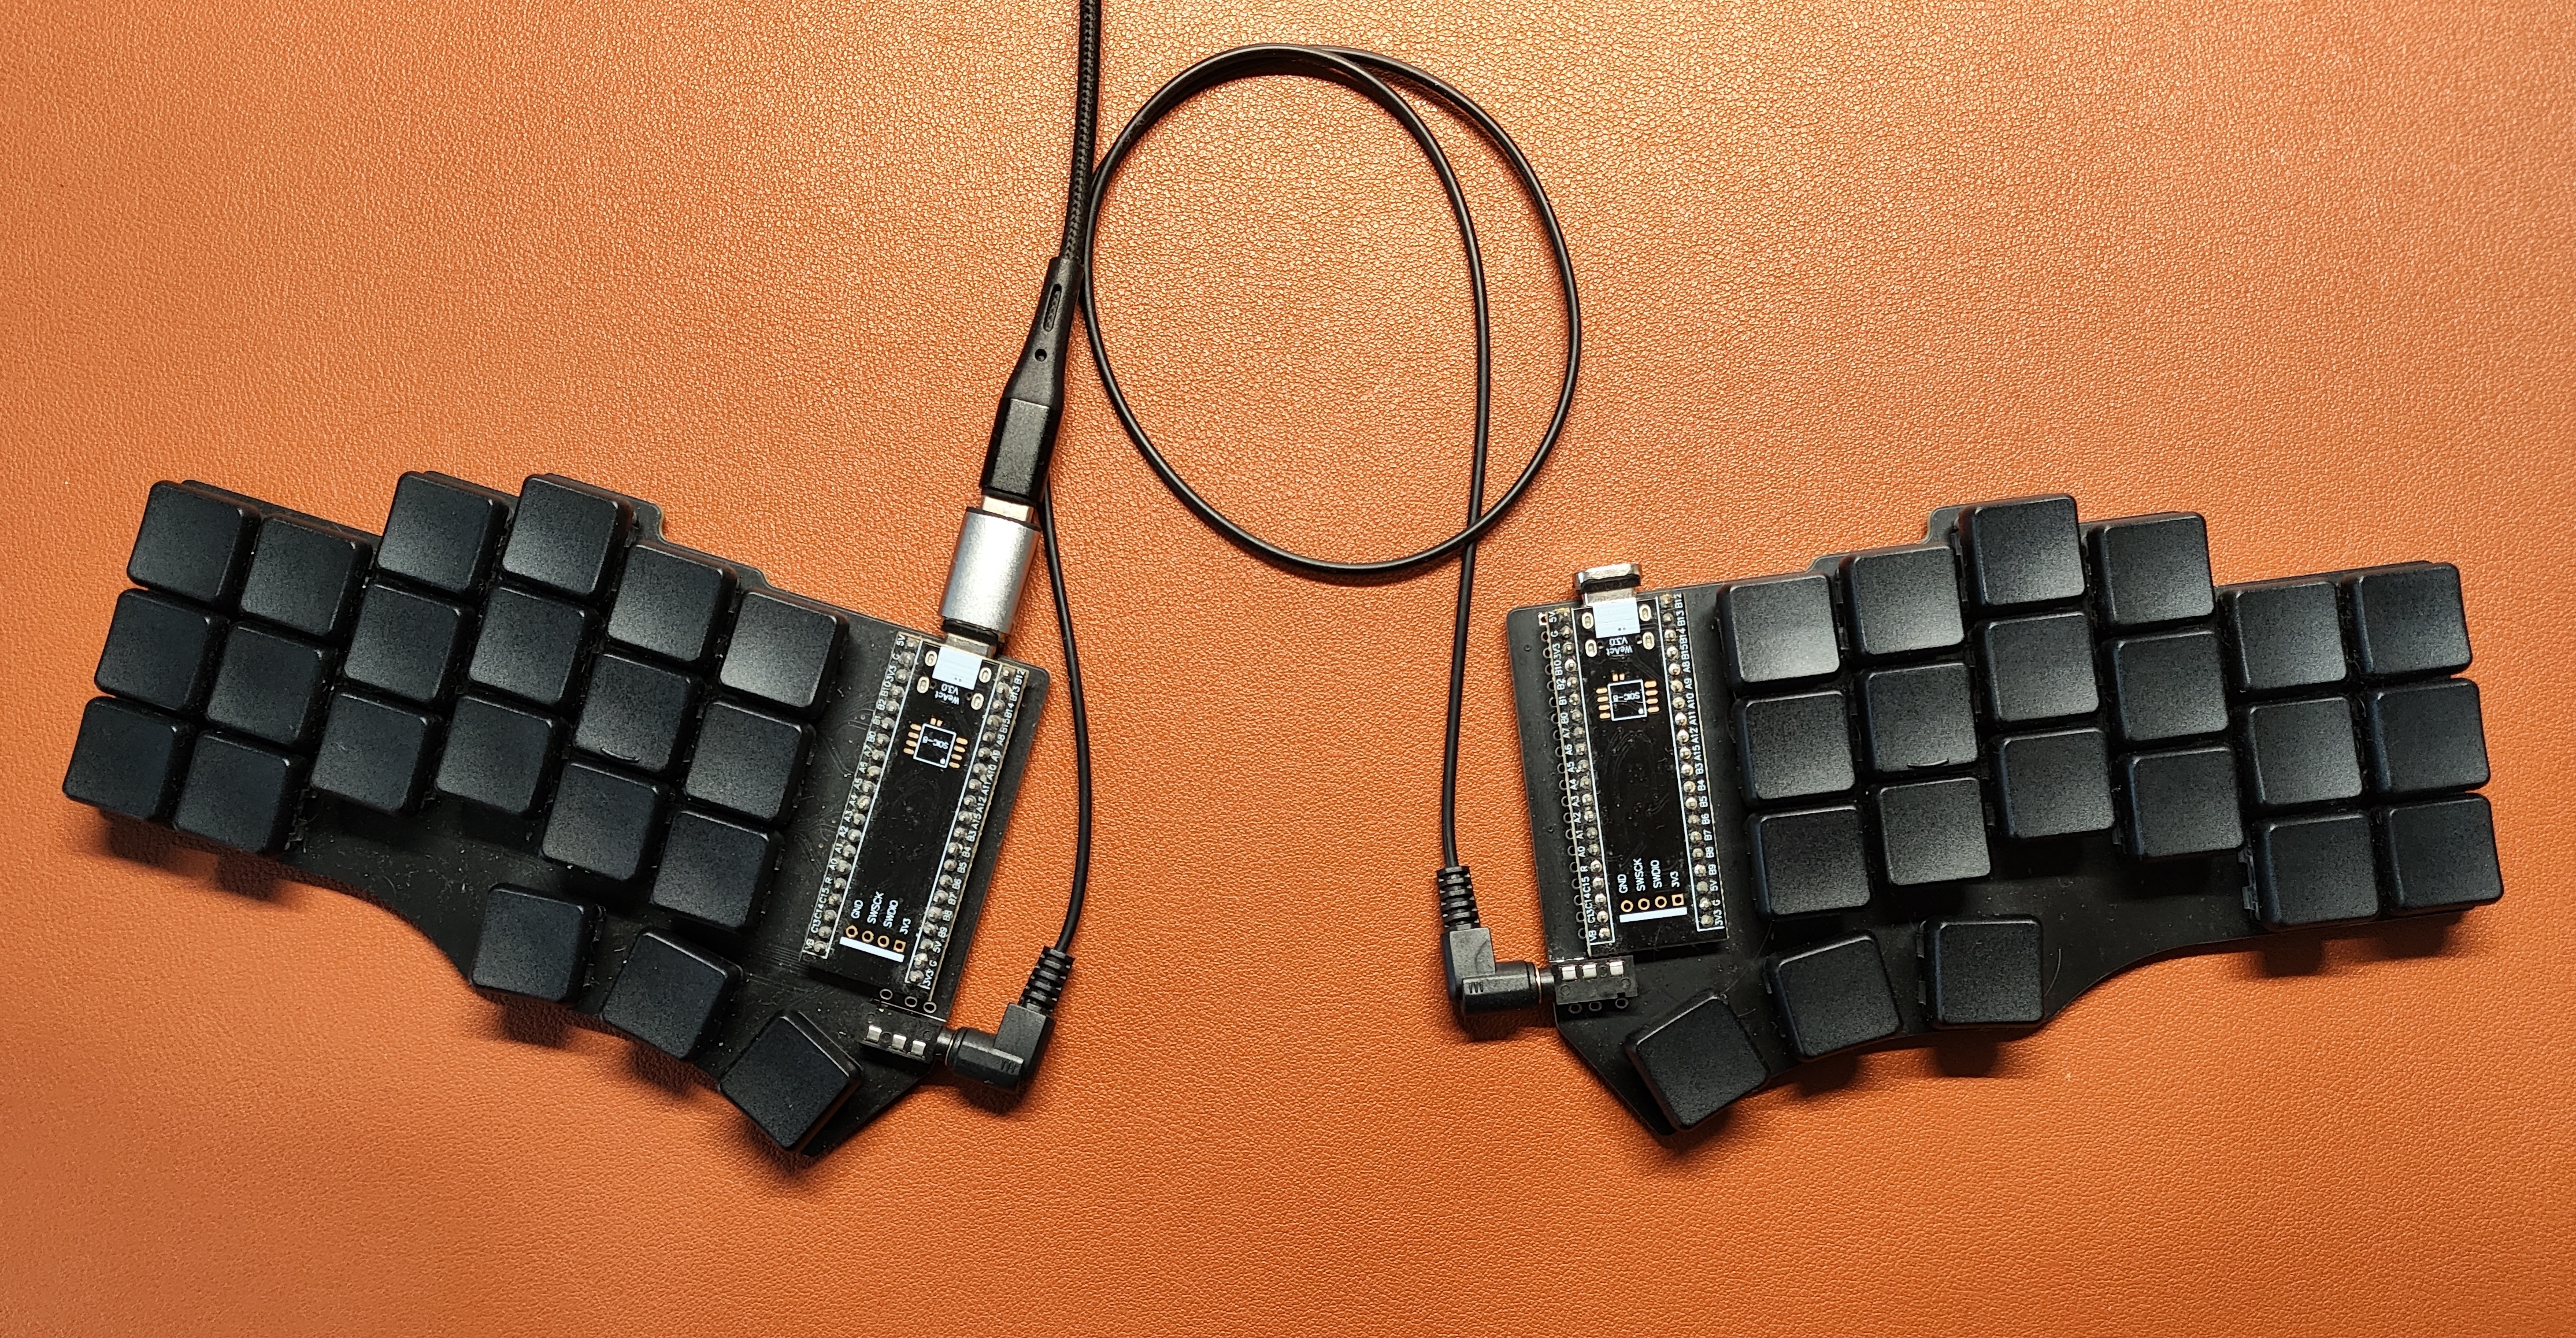
The Cantor is a 40% split keyboard with 42 keys. It was inspired by Corne and other similar keyboards, but it has a stronger column stagger which is useful for those with larger hands, like mine.It is a very simple keyboard and it was designed like that on purpose to keep the price low and the assembly process simple.
Hardware
The Cantor repo on Github contains all information you need. Almost every part with the exception of the PCB can be bought from Aliexpress. The PCB can be ordered from either JLCPCB or PCBWay. I ordered mine from JLCPCB and it cost me £16.47 for 5 PCBs. All parts cost me £80.61, but the the price per one assembled keyboard was around b£66. Some of these parts are sold in lots, so you are left with a few spare ones, but there is no other way of getting around this, unless you order a DIY kit from vendors who sell those. Ordering parts from Aliexpress is still a cheaper way to buy them compared to those kits! I wanted to try building one keyboard and perhaps in the future experiment with more, so I went this route. There are however vendors who sell pre-assembled keyboards, so if you do not mind paying extra for this service, this is a good way to check if this sort of keyboard is for you. Here is a table with the parts and their prices:
| Item | lot qty | qty per kb | lot price | per kb price |
|---|---|---|---|---|
| Cantor PCB | 5 | 2 | 16.47 | 6.588 |
| STM32F401 Blackpill Controller | 2 | 2 | 6.96 | 6.96 |
| TRRS Cable | 1 | 1 | 3.92 | 3.92 |
| TRRS Port | 10 | 2 | 2.61 | 0.522 |
| Khail Choc Brown Key Switches | 50 | 42 | 26.3 | 22.092 |
| PBT keycaps | 50 | 42 | 22.43 | 18.8412 |
| 6mm x 2mm rubber feet | 100 | 16 | 2.15 | 0.344 |
| Soldering kit (soldering iron, soldering silicone mat, solder) | 1 | 1 | 6.77 | 6.77 |
| Total price | 80.61 | 66.0372 |
Build process
Soldering
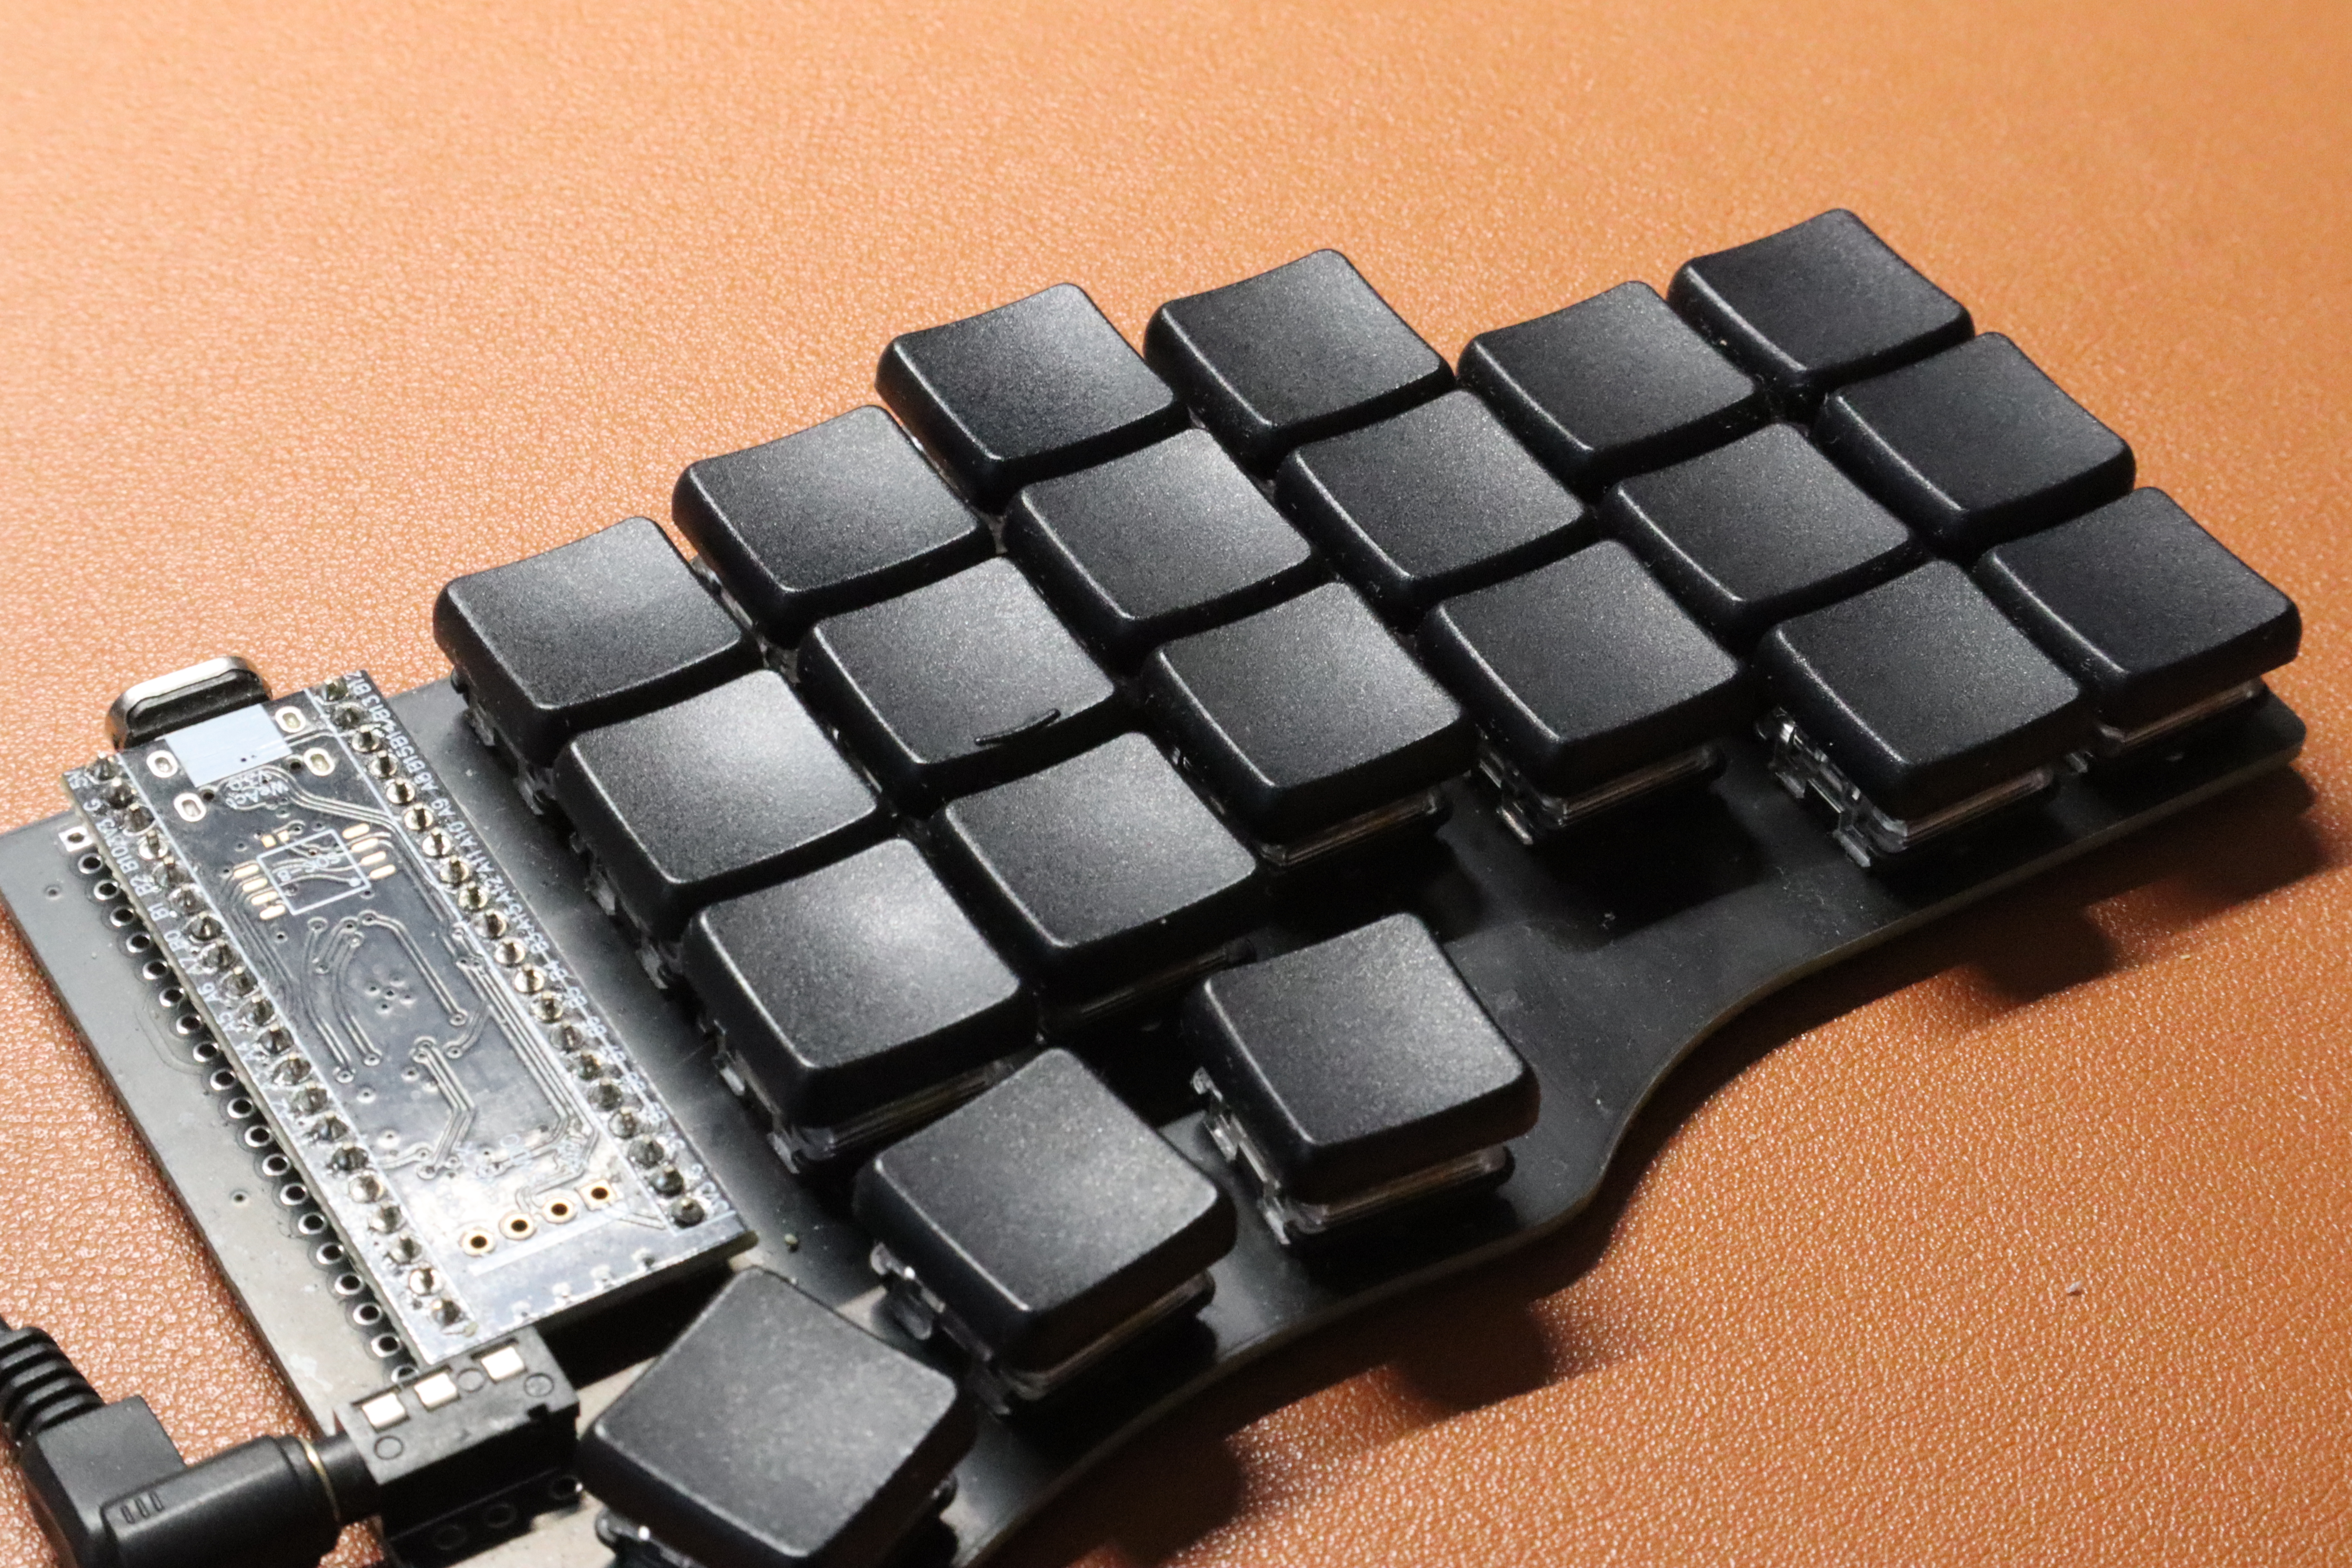
Unlike all keyboards that you can buy from a store, the Cantor is a DIY, so you need to be comfortable with soldering, or you need to learn how to do it. I had never soldered before, so I had to learn how to do it. I watched a few videos on youtube and I thought that it isn’t that complicated. If you are in the same, position like I am, I would recommend you to buy a soldering kit which contains thin solder wire 0.5mm or thinner. Anything thicker and it will be difficult to contain how much solder you put and you can end up ruining your PCB or other parts. I also recommend you to buy a silicone mat and a magnifying glass. The mat will stop you from burning your table and the magnifying glass will help you to see what you are doing. I didn’t buy a magnifying glass and I regret it. After staring at tiny PCB elements for a couple of hours my eyes were tired and I was beginning to make mistakes by trying to finish the job quickly.
The entire build process took me about 6 hours. Fortunately, Cantor’s build guide is very straightforward and easy to follow. Once you do one part, the other one is much easier.
Flashing the firmware
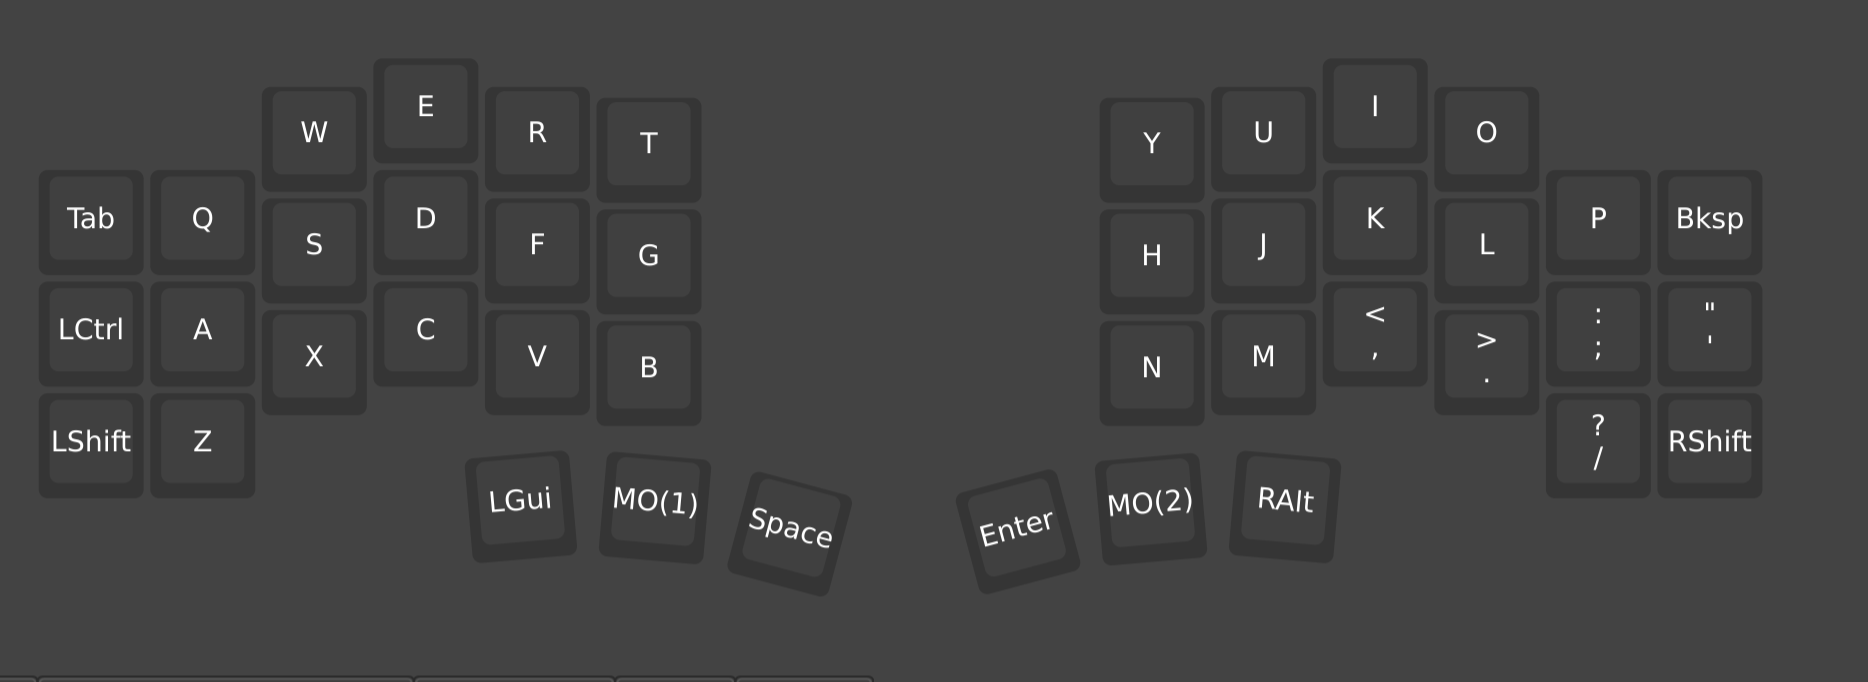
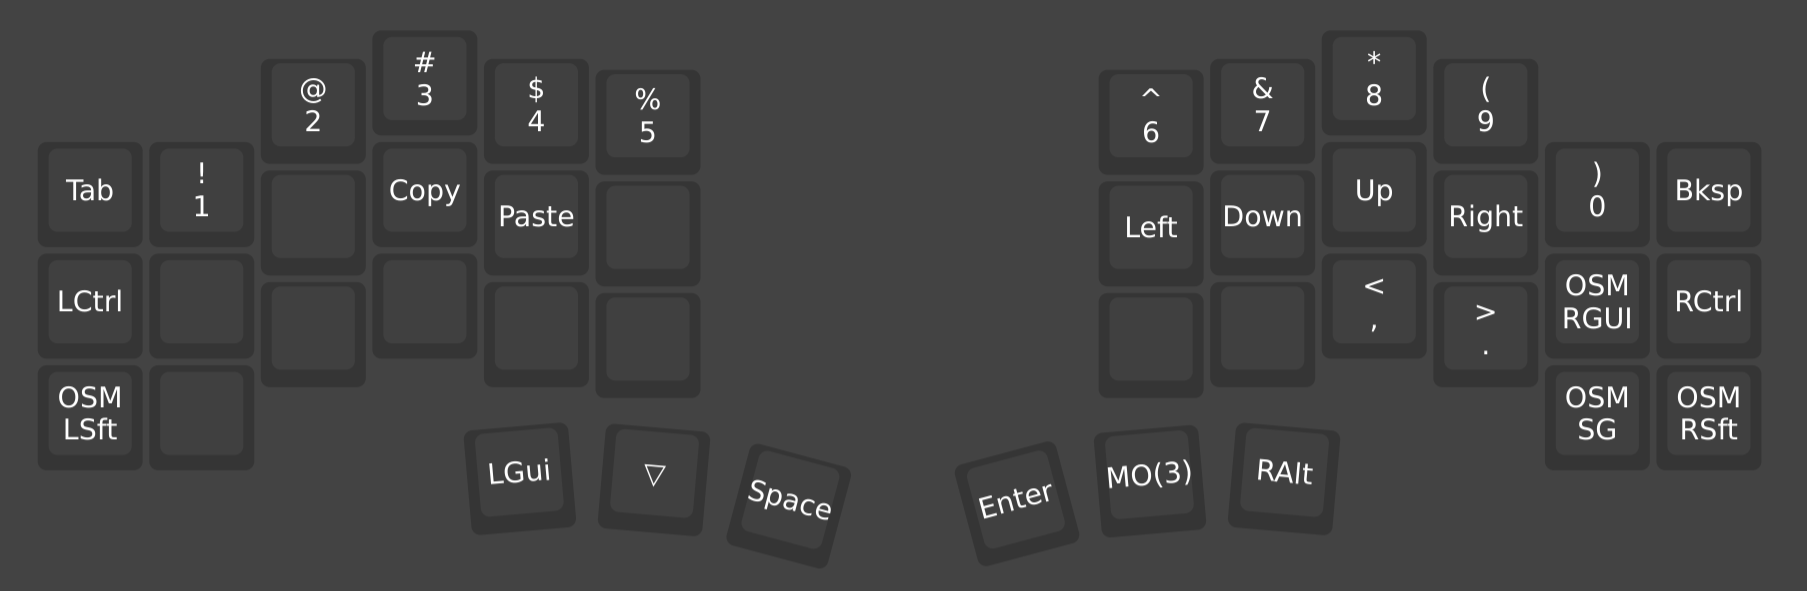
Cantor uses QMK firmware, which is a very popular firmware for custom keyboards. It allows for a lot of customization and it is very easy to use. You can use QMK configurator to create your layout, or you can write it in C. There are also alternative configurators such as VIA or alternative firmware such as Vial which comes with its own GUI. I decided to use Vial, because it is very easy to use, does not require re-compiling the firmware each time you want to change something, and it has a nice GUI. I think that the default key layout on Cantor is terrible and you really need to spend some time to figure out what you want. I spent a few days looking at different options and I started with a layout similar to the default Corne layout.
To compile and flash the firmware onto controllers (you need to do it for both sides) you need to clone the qmk-vial repository, go inside the directory and run the following make command after plugging the controller into your computer:
make cantor:vial:flash
Remember to repeat this process for the other side of they keyboard on the other controller.
If you are not on Linux, you can use the GUI to flash the firmware. Download the QMK Toolbox and flash a binary which you can download from this website. Disclaimer: I have not tried this method and cannot guarantee these binaries weren’t tampered with, so use your own judgement.
Software
Once you have done this, you can plug the controller which will be the master into your computer and use the GUI or a chromium-based browser configurator to configure your layout.
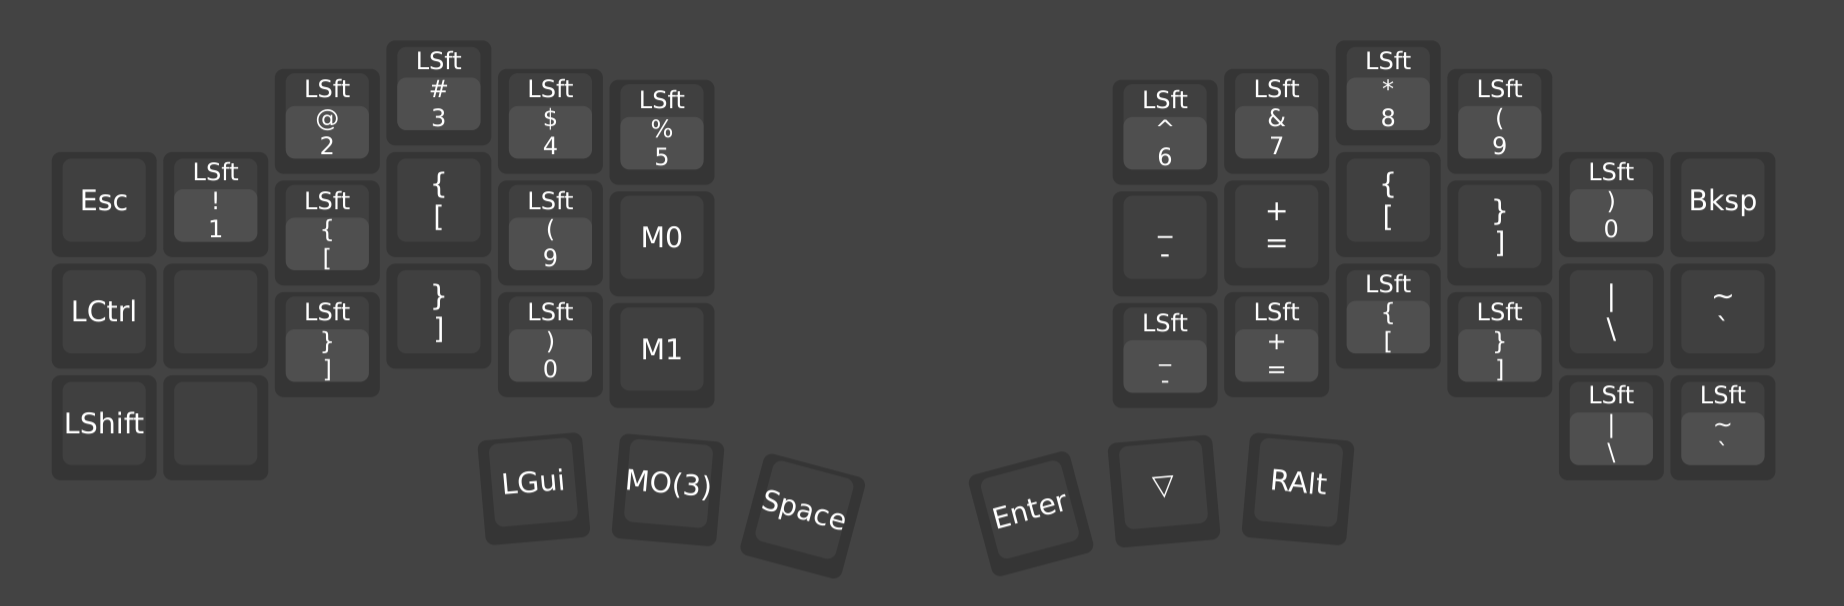
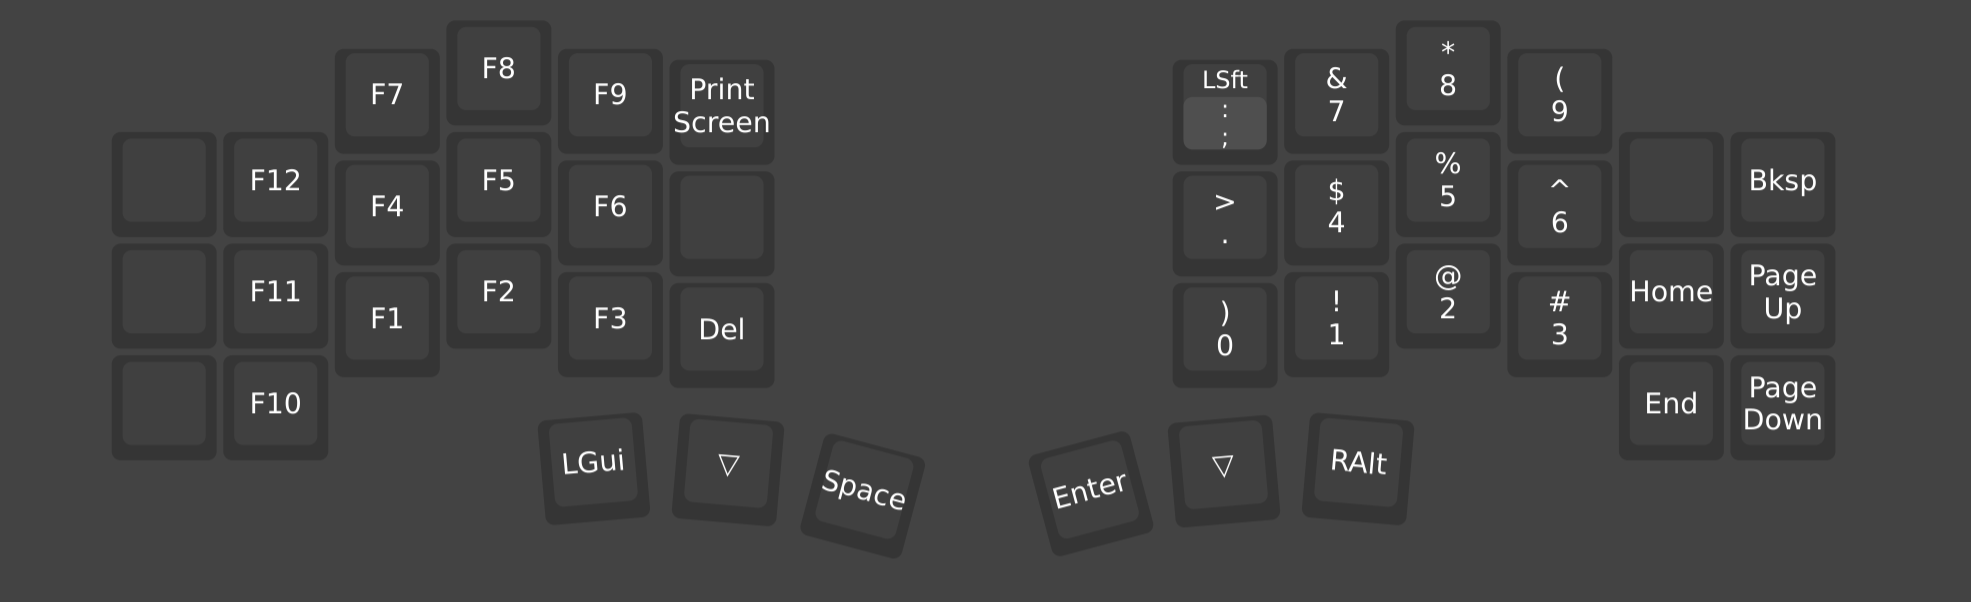
After few trials and errors, I ended up with a layout that I was happy with. It looks like this (each picture is a different layer):
Learning to touch type
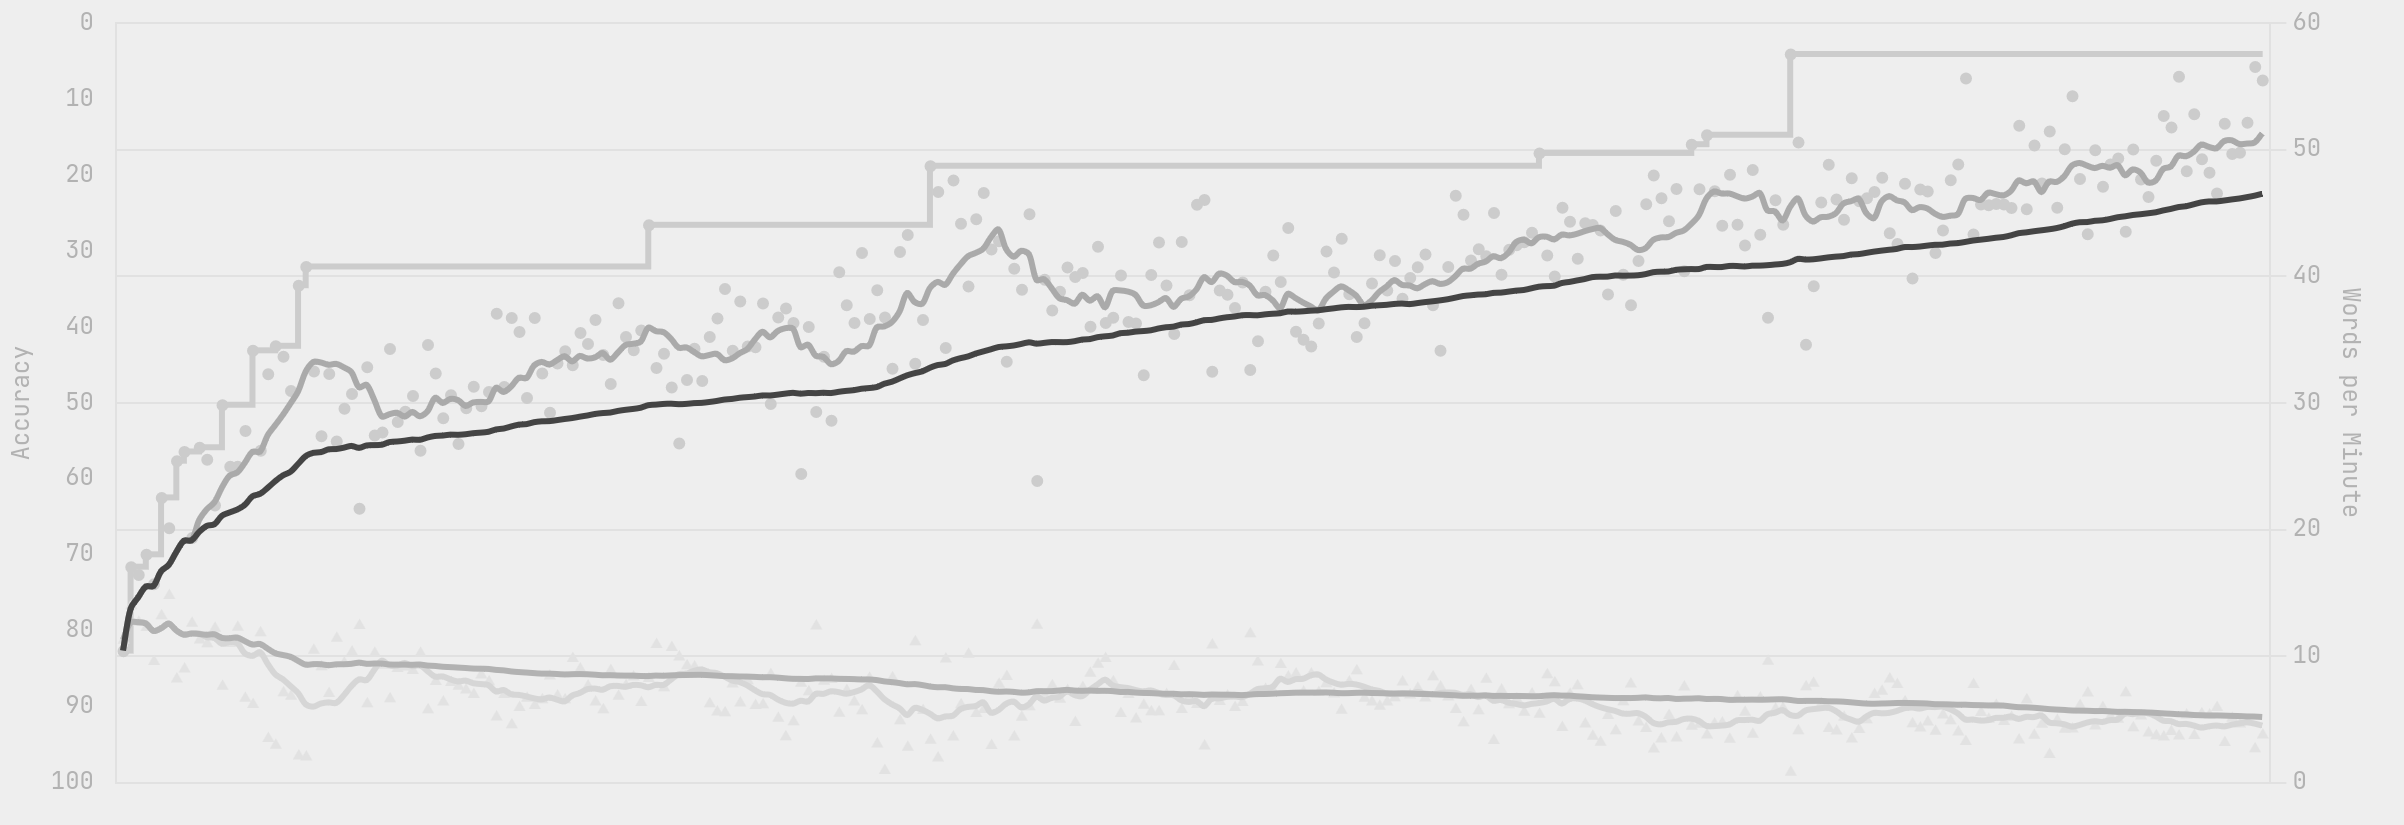
When I started using the Cantor I could not touch type. Being used to a standard keyboard layout, I was making a lot of mistakes and I was very slow. Even with a layout printed out and placed in front of me, I was still making mistakes. I decided to improve my typing by practicing. Firstly, I stared doing exercises on keybr.com, which would teach me to type common word combinations. Once I spent few weeks doing those for 30 minutes a day, I decided to move to exercising by typing words out. I found a website called monkey-type. I set my settings to typing 50 random words and I started to type. I did this for a few weeks and I noticed that I was getting better. I was making less mistakes and I was typing faster. I also noticed that I was getting used to the layout and I was not looking at the keyboard as much. I was also getting used to the column stagger and I was not making as many mistakes as I was before. I was also getting used to the thumb keys. At first I was so bad that often times the website would error out telling me I was too slow and too bad to calculate the statistics. Now I can type close to 60 words per minute, which isn’t great but for usual typing and coding it is enough. I am still making mistakes from time to time, but I believe that with more practice I will get better. I stopped doing these exercises now because I feel like typing on this keyboard is actually more comfortable than on a traditional one. Here is the graph of my progress. It took me about two months to get to 40 words per minute.
Conclusions
I am very happy with the Cantor. It is a very comfortable keyboard to type on. I really like low profile mechanical switches and I think that the column stagger is great. There are a few things that I would change if I were to build another keyboard. I would use a different color of switches, because the brown ones are not light enough. I had to lube them which was time consuming and although it improved them by a lot, they still feel a little too heavy. I learnt my lesson and bought a switch tester, and decided that pink/gChoc switches are the best for me. I would also invest in a plastic case to cover the PCB. I did not do it to save money but I can see that dust collects on controllers and it difficult to remove if it gets between solder points which are too close together to use a brush or blow the dust with a can of compressed air.
These minor issues aside, I am very happy with a switch to a 40% keyboard and I don’t see myself getting much larger one in the future. I also think I won’t be going back to a traditional keyboard. If you are thinking about getting a split keyboard, I would recommend you to do it. It is a fun project and it is very rewarding.